How to Embed Google Maps in WordPress Website: Beginner’s Guide

How hard is it to find a specific location? Better yet, how hard is it to actually get lost in the current rising age of technological advancements? GPS and location services have made it possible for any person to be able to navigate around the surroundings, regardless of where they are. So how can a business owner or a website owner make use of these incredibly convenient public services? An easy solution is simply to embed Google Maps in WordPress.
Own a business and want to give directions to your viewers regarding the closest shops to them? Or perhaps you want to show off excellent locations, restaurants, entertainment centers and more on your blogs. Maybe just plan to pinpoint some area in your posts? Embedding a google map to your post is the answer to all your questions.
Google Maps is the best platform for location services currently. It’s convenient, yet free features such as advanced location listing, Google Street view, integration with Public transits and other such benefits set it a step above existing competitors. So the obvious question to ask is “How to use this extremely beneficial free service?”
However, it is not as easy as it sounds to embed Google Maps in WordPress. That is, unless you know what you’re doing. Once you do, however, you’re it takes very little time to do and can improve your visitor engagement by a lot.
So, we present you this step-by-step procedure of the whole process to embed Google Maps In WordPress.
Method 1: Directly Embed Google Maps in WordPress
The simplest way to add Google Maps is by directly using an Embed code provided by Google itself. And while it doesn’t let you add anything more by itself, it certainly does the job correctly.
Here are the steps required to embed Google Maps in WordPress:
First, go open Google Maps, then search for the required location, street or the required place. Then, click on the ‘Share’ button and then on the ‘Embed map’ option. Finally, choose the required size of your google map ( you can also manually enter the required size of the map) and copy the given Embed code.

Next, once you have the embed code, you can insert the code as an HTML Block into your post. Just click on the plus icon to add a block and look for Custom HTML Block under the Formatting section. Now paste the embed code here. If you click on Preview, you will be able to see how it looks.

It is also quite easy using the Classic Editor as well. You can insert this code directly into your post by copying the code into the text editor.

After saving your post, your map should be shown in the post correctly as below:

Method 2: Using a Plugin
While using the first method is easy as well, it isn’t efficient. Adding multiple maps in a single post requires more effort, and there are plugins out there that can cut a majority of the work in a single click.
WordPress Google Maps plugins work by easily letting you insert your pre-made custom map on the post. Furthermore, they let you add more details using elements like custom markers, modified map box, custom texts, and descriptions, etc. and adding features such as Streetview and real-time traffic.
Before you start, do remember that you require a Google API key to use the Google maps plugins on your website or application. So, if you don’t have one already or don’t know how to register one, here’s the procedure to create one:
Most Google maps plugins require API keys for the following services:
- Google Maps Javascript API
- Google Places API Web Service
- Geocoding API
- Directions API
- Geolocation API
This link allows you to register for these APIS using your Gmail ID instantly.
However, you can easily register for the above APIs using this link :
If you used the former link, it leads you to a page to either create a new project or register for an existing project(if you have one.)

Now that the project is made and the APIs are enabled (done automatically), you are required to use a Credential(the required API key) for using these APIs.
If you aren’t directed there automatically, follow the next step. If you are automatically directed to the following page, skip the next step.
Click on the Credentials button on the dashboard and then click on Create Credentials. Then choose the API key button.

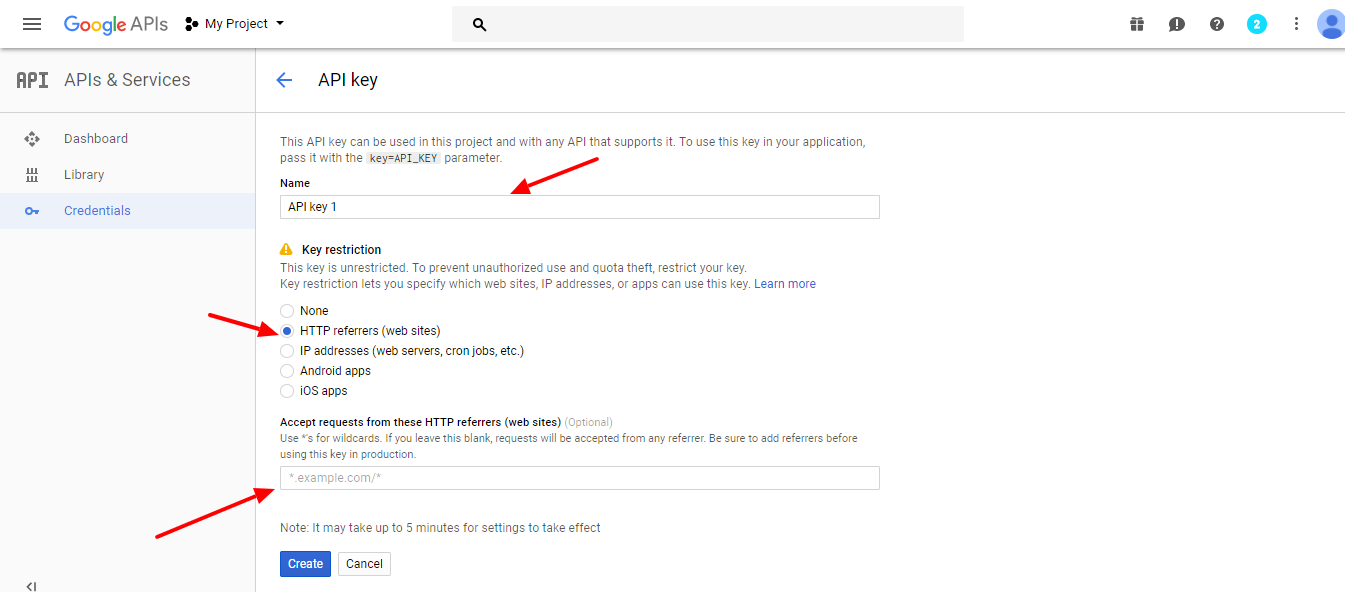
You can now receive the API key, but you’re not done yet, click on Restrict Key to setup restrictions for the API access. Here are the entries you need to fill:
- The name of the key: Fill in the appropriate name for your credential.
- Key restriction: This is to restrict who can access the Google API through your key. Use HTTP referrers here since for now, you’re only using this for your website.
- Web Site referrers: Insert the websites which can access the API through your Key. Insert your website name between the *. For example: *.beautifulthemes.com/*

Click on save and now you should have your API. Copy this and insert it into your plugin’s settings. This differs based on the Plugin itself. But most of them ask for the API in the Plugin settings or straight on their Interface.
Best WordPress Google Maps Plugins & Widgets
There are many plugins on the web that provide these features and more. After thorough research, we have chosen a few of them as mentioned below. These plugins have a free and paid model, but they all are usable enough in their free versions. So you don’t have to worry if you don’t want to invest a lot into your WordPress Google Maps plugin.
All of these are equally usable and provide enough resources for any author. But, for this demonstration, we have chosen Google Maps Easy by supsystic, because of its customization features and intuitive design. It is also very easy to use and has all the relevant features in the Free version.
Let’s start with this.
1. Google Maps Easy

Google Maps Easy is a fantastic plugin that manages to be feature-rich and highly flexible while still being intuitive to use. You can create and customize various maps to your liking and easily include them into your posts and pages. Furthermore, you can spruce up your maps with an unlimited numbder of map markers.
Features:
- Unlimited number of map markers with media descriptions
- Fully responsive
- 100% customizable.
- Add map with shortcode or PHP code
- Google Maps and Markers Import and Export
- Tons of map stylization options
Using the Plugin
Before anything else, you will need to install the plugin. If have any confusions, check out this article on how to install WordPress plugins.
Once you’ve installed and activated the plugin, you can move on and insert the API key. From your Dashboard, go to Google Maps Easy>>Settings and look for the User API key field. Simply paste the key that was created earlier and click on Save.

Now you can go to Google Maps Easy>>Add Map and start creating maps to insert into your posts. There are a ton of options to play around with here but you can start by entering the appropriate Map Name and dimensions. Regarding the dimensions, you can set the map to automatically adapt to the screen height.

Another important feature is the option to set where the map is centered. You can scroll down and find the Map Center options. If you don’t want to manually drag the map to where you want, then the plugin has you covered. You can either enter the exact address or just enter the coordinates in latitudes and longitudes.

You can add markers to you map, to make things even better. Just click on the Markers tab at the top. From here, you can enter the name, description, icon, and adresss for the marker. You can even add media to make it even more engaging. If you scroll down, you can find the option to put a link in the marker as well.
As for descriptions, this flexible plugin allows you to choose whether they appear by default or on mouse hover. Once you are done. click on the Save Marker button underneath the map.

If you want, you can simply insert the map as it is. Just click on the Save Map button just underneath the map. Now if you scroll up, you will be able to see that a shortcode has been generated. All you need to do now is paste the shortcode into your post/page and the map will be embedded. As you can see, it really is that easy to embed Google Maps in WordPress.

Other Features
- Map type control: Change the way the map type control on the top left works or remove it entirely.
- Zoom control: Set whether the zoom control on the right appears or not.
- Street view control: Set whether the street view icon on the right appears or not.
- Draggable: Choose whether or not the map can be dragged by the mouse.
- Double-click to zoom: Change whether visitors will be able to double-click to zoom.
- Map zoom: Enter the default zoom level as well as the minimum and maximum zoom levels.
- Google Map Theme: Choose one of the four available Google map themes.
- Map Stylization: Pick a map style for the map.
- Markers Culsterization: Choose to group your markers in a way that doesn’t overlap one another.
More WordPress Google Maps plugins Worth Looking At:
2. WP Google Maps

One of the easiest and quick plugins to help you embed Google Maps in WordPress, WP Google Maps is an awesome plugin to use. You will easily be able to create responsive maps with roadmap, terrain, satellite, and hybrid support. With a user-friendly interface and supplied shortcodes, this plugin is perfect to include page maps, routes, and maps on your site!
Features:
- Easy to use and responsive maps
- Multiple Map marker feature with further customization
- Google Street View support
- Roadmap, terrain, satellite and hybrid map type customization
- Localization and language support
- Polylines, Polygons, and Route insertion feature.
3. Google Maps Plugin

Google Maps Plugin is another plugin that contains all the features you could need despite being absolutely free. With this, it will become a piece of cake to embed Google Maps in WordPress. Its powerful UI map builder can be used to create custom maps that will improve the looks of your site without any hassle. It even allows you to set up map color styles with either predefined color schemes or using custom colors.
Features:
- Setup initial position and zooming level of a map;
- Adjust controls settings and positioning;
- Multiple locations
- WordPress location custom map
- Setup map color styles
- Add markers
Concluding:
Now you’re all ready to embed Google Maps in WordPress. Use Google Maps’ Geographical and Location services to your website’s advantage. Whether you want to show Store locations or give useful directions to readers, you are ready to do it all. So go ahead and show the way of the world to people, through your own website.
If you want to add more engaging content to your WordPress website, why not check out these posts:
- How to start WordPress podcasting.
- How to add Google Analytics to WordPress.
- Adding Rich Snippets to WordPress.


