How to Embed Google form in WordPress: With and Without Plugin

The use of dedicated WordPress form builder plugins such as an Everest form builder is at large in the market currently. But not all of these plugins can fulfill your demands completely. Not all of them provide full services at free cost either and may simply not be able to cover situations such as quizzes or questionnaires. So let’s introduce an alternative option, reader interaction using embed Google form.
Reader responses are perhaps the most beneficial part of the improvement cycle that you can implement on your WordPress websites. With critical reviews and rational criticism, you can create new ideas and concepts that can help you as well as your site to grow.
Why embed Google forms in WordPress?
Google forms is an excellent form creation service that lets you take responses and share questionnaires and quizzes to a large set of users. This data can be easily shared between multiple users for better analysis of the surveys done. At the same time, the forms and data collected are all stored in the same location, the secured vaults of Google cloud. This provides security and accessibility which cannot be matched by a lot of third party form plugins out there.
The google drive sub-service also can be set up for a wide range of purposes and is not only limited to taking critical responses for your content. The general uses you can implement Google forms are :
- Creating surveys and questionnaires
- For creating a subscription service for newsletters
- Creating polls for various decisions to be made.
- Adding user-content to your website
And much more.
The sheer versatility and ease of access make Google forms a great option for various purposes. Furthermore, you can configure Google forms to ensure that only proper users with an email can only send forms to you. This helps to eliminate needless spams and unnecessary form submissions.
How to embed Google Form in WordPress?
The native method to embed Google forms on your WordPress page is using the in-built embed feature for Google forms. First, we need to open Google forms, so go ahead and access it through your browser using this link.

Click on Go to Google forms to start creating a new form or access older ones you’ve made already. Now, you can either create a completely new form or use one of the templates Google provides or use any of your older forms if you have any. For this demonstration, we’ll be using the template for Contact information.

Once you’ve created your form, click on SEND button on the top right. Then, on the Send Via section click on the Embed logo which looks like a lozenge.

You will now receive the HTML embed link in the next window. Furthermore, you can also change the size of the form using the Width and Height settings. Copy this embed link once you’ve customized Width and Height of the form according to your satisfaction.

Next, in order to insert into any page or post using the Gutenberg Editor, we can simply copy our embed link and paste it directly into the editor.

For the Classic Editor, you will need to insert it onto the Text editor.

This should enable the embed Google form on your post or page based on where you paste the embed link.
Embed Google Form in WordPress using plugins
While using embed links for Google forms is a viable solution, there are issues with it. For one, the design of the form you use is already established and thus is not customizable. The iFrame loaded form might cause a jarring contrast between your WordPress theme and the design of the form. Furthermore, the interface for the form is completely separate from your website and thus might not have the same CSS customizations.
Thus, we introduce the method to embed Google form in WordPress using third-party WordPress plugins. This process is a lot less direct and adds a few more steps to the procedure but instead lets you add customization and your personal flair to your forms.
Now, we usually also recommend some great options for the plugins that can achieve this task. However, the lack of viable options for this purpose has made this quite difficult. Thus, for now, we can only recommend Google Forms plugin for this purpose.
Google Forms

By using shortcodes and removing Google’s HTML wrapper, this plugin works to render the HTML element for your embed Google form as a part of your website itself. This lets you embed your Google forms while ensuring it fits with your CSS customizations on your website.
The plugin works in conjunction with Custom Post types to allow users to embed Google forms onto pages and posts. You can also enable other functions on your embed such as confirmation links, URL redirection for confirming forms, Titles, email notification and sending as well as many other features.
So without further ado, let’s look at the working procedure of this plugin.
How to Embed Google Form Using The Plugin:
First, you need to have this plugin installed. If you are not aware of the steps required to do so, consider reading this article. Once the plugin is installed, refer to its interface page through WP Admin Dashboard. Click on Google forms on the dashboard to start embedding your forms.

Now the plugin works in two steps, the first step requires you to creating a new form and linking it to the published Google form. Then we can customize the plugin the way we want.
Click on the Add New Google form button on the top to prepare your Google form first. Provide a title to your Google form first as the plugin functions by letting you build a custom post.

Next, open your own Google forms first, and then, like we did before to embed, click on Send to. Now instead of using the embed link, use the share link. This can be selected by clicking on the link icon. Copy this link and save it for the next step.
NOTE:
An extremely important thing to remember is that this plugin was built for the older Google forums. Thus, if you were to copy the link you get currently as is, the plugin will not function. For this purpose, we need to enable the older forms instead. This can be simply done by clicking on the help button on the bottom left of the page and clicking on the Back to the old forms button.
Repeat the process noted above to receive the shareable link by clicking on Send and then clicking on Copy to copy the link to the clipboard.

Then on the first field labeled Form URL, paste the link of your Google form. Now we can go ahead and customize the form the way we want. Since the plugin provides an absurd number of options and features, we’ll be only explaining the crucial aspects as well as elements you can enable to ensure your form is highly functional.

Google form details:
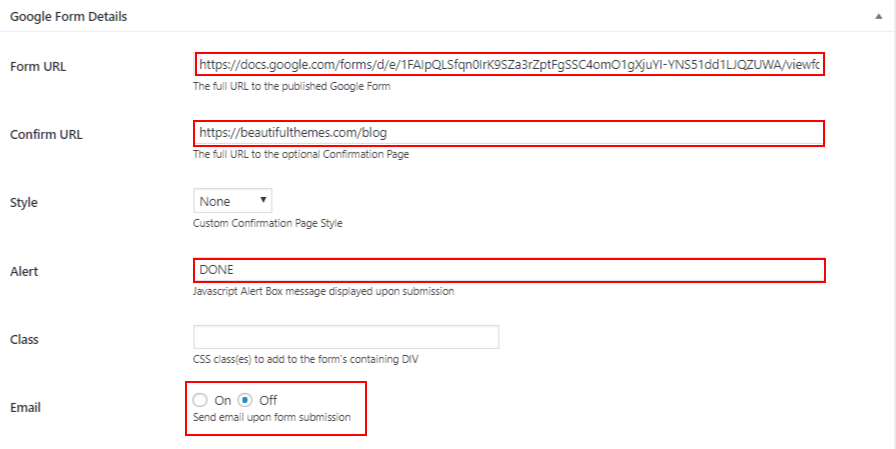
Confirm Url: This is the URL you can use to redirect the users once they’re done filling up the form. This can be simply a redirect to the main blog page or a different post for the readers to view.
Alert: You can enter a custom alert message to inform the respondent once they submit the form using this.
Email: Using this feature, you can enable or disable the feature to send a confirmation email to a specified email account. This way, the administrator can track when new forms have been submitted.
Google Form Field validation:

Validation: Jquery validation for all fields can be enabled by this option. This ensures that the form respondent correctly fills up the form fields. This can be further specified for given fields using Form fields feature. The field can check for the date, email, and many other data.
Google form Hidden details:

Hidden fields: The Google form plugin also lets you enable a hidden field which is not filled by the respondent. Instead, the field automatically takes in the required data at the time of submissions such as URL, timestamp, http_refurer, user_email or user_login. This can be used to track automatically recorded data to note when the form was submitted, by whom and more.
Google form Default Text overrides:

Override: This feature lets you override the default text displayed for fields and buttons. You can change the text for the required fields, submit button, Back button, Continue button, Radio buttons and Checkboxes.
You can also enable more options to improve the effectiveness of your embed Google form using the Google form options on the right sidebar of the page. The options provided lets you enable captcha for anti-bot/anti-spam systems, choosing the number of columns on the forms as well as orders and emailing end user.
Once you finish customizing your form, click on Publish to publish the form, as you would publish a post. Now, you have effectively created a custom post ready to be interlinked with your other pages and posts.
Next, refer back to the Google forms page on the dashboard and take note of your Google form you just created and its shortcode.

In order to embed the form that we just created, simply enter this shortcode onto any post and its visual editor. Once it is done, the post will contain the Google form you just created in a more fitting manner.

This should give an output such as :

Conclusion
Thus, using plugins or using the native embed method Google provides, you can enable embed Google forms on your WordPress websites. The features it provides are completely free and are highly versatile to fit a large number of purposes. However, using Google forms might seem like a daunting task. Perhaps, you are not satisfied with it. Then, you can always try out third-party form plugins.
There are a large number of them out there, but we personally recommend these set of Contact form builders and Survey form builders as a start. Furthermore, if you want to learn more about improving viewer interaction, we recommend you check out some of our other posts such as :
- How to set a WordPress frontpage/homepage
- How to create a WordPress file upload form
- Adding Facebook fan box to WordPress


